One kit guitar. One hobbyist guitar builder. Lots of mistakes made. Mothers-in-law made angry. A ridiculous amount of time spent. Welcome to the #DIYKitChallenge22.
Disclaimer: Harley Benton invited me to be part of their DIY Kit challenge, and I was monetarily compensated for my efforts. However, whether the video/post was sponsored or not, the company has no say in what I talk about in the video/post, nor do they get to see the content before it is released.
Harley Benton CST-24T Kit Build Series: Part 1 | Part 2 | Part 3
Harley Benton CST-24T Kit Specifications
- Complete Do-It-Yourself kit
- Body: Rengas (wood colour may vary) with binding
- Bolt-on neck: Maple with binding
- Fingerboard: Amaranth
- Dots fretboard inlays
- 24 Frets
- Nut width: 42 mm (1.65″)
- Scale: 628 mm
- Pickups: covered humbucker (bridge) covered humbucker (neck)
- 1 Volume and 1 tone control
- 3-Way switch
- Tremolo
- Chrome hardware
- Die-cast tuners
- Original strings: .010-.046
- Colour: Natural
Note: A certain level of craftsmanship is required for successful assembly
Body and neck have been primed with pore filler (suitable for varnishing, but possibly unfavourable for staining – may have to be sanded again)
What Is DIY Kit Challenge?
Harley Benton held a DIY kit challenge in the spring of 2022, where both influencers and customers could participate in a contest by getting one of the Harley Benton DIY kits, assembling them, and doing various finishing and modification works on them to create unique-looking and functioning instruments.
Why I Chose Harley Benton CST-24T Kit
Ever since I had assembled a T-style kit, I had an itch to do more of these Harley Benton kits. This time I wanted to go all the way with custom paint jobs and everything. And since I was also taking part in a contest, I wanted to do something that stood out. So I came up with the idea of taking a PRS-style guitar and finishing it with a very familiar finish from a completely different kind of guitar. But more on the design later.
What’s In The Box?
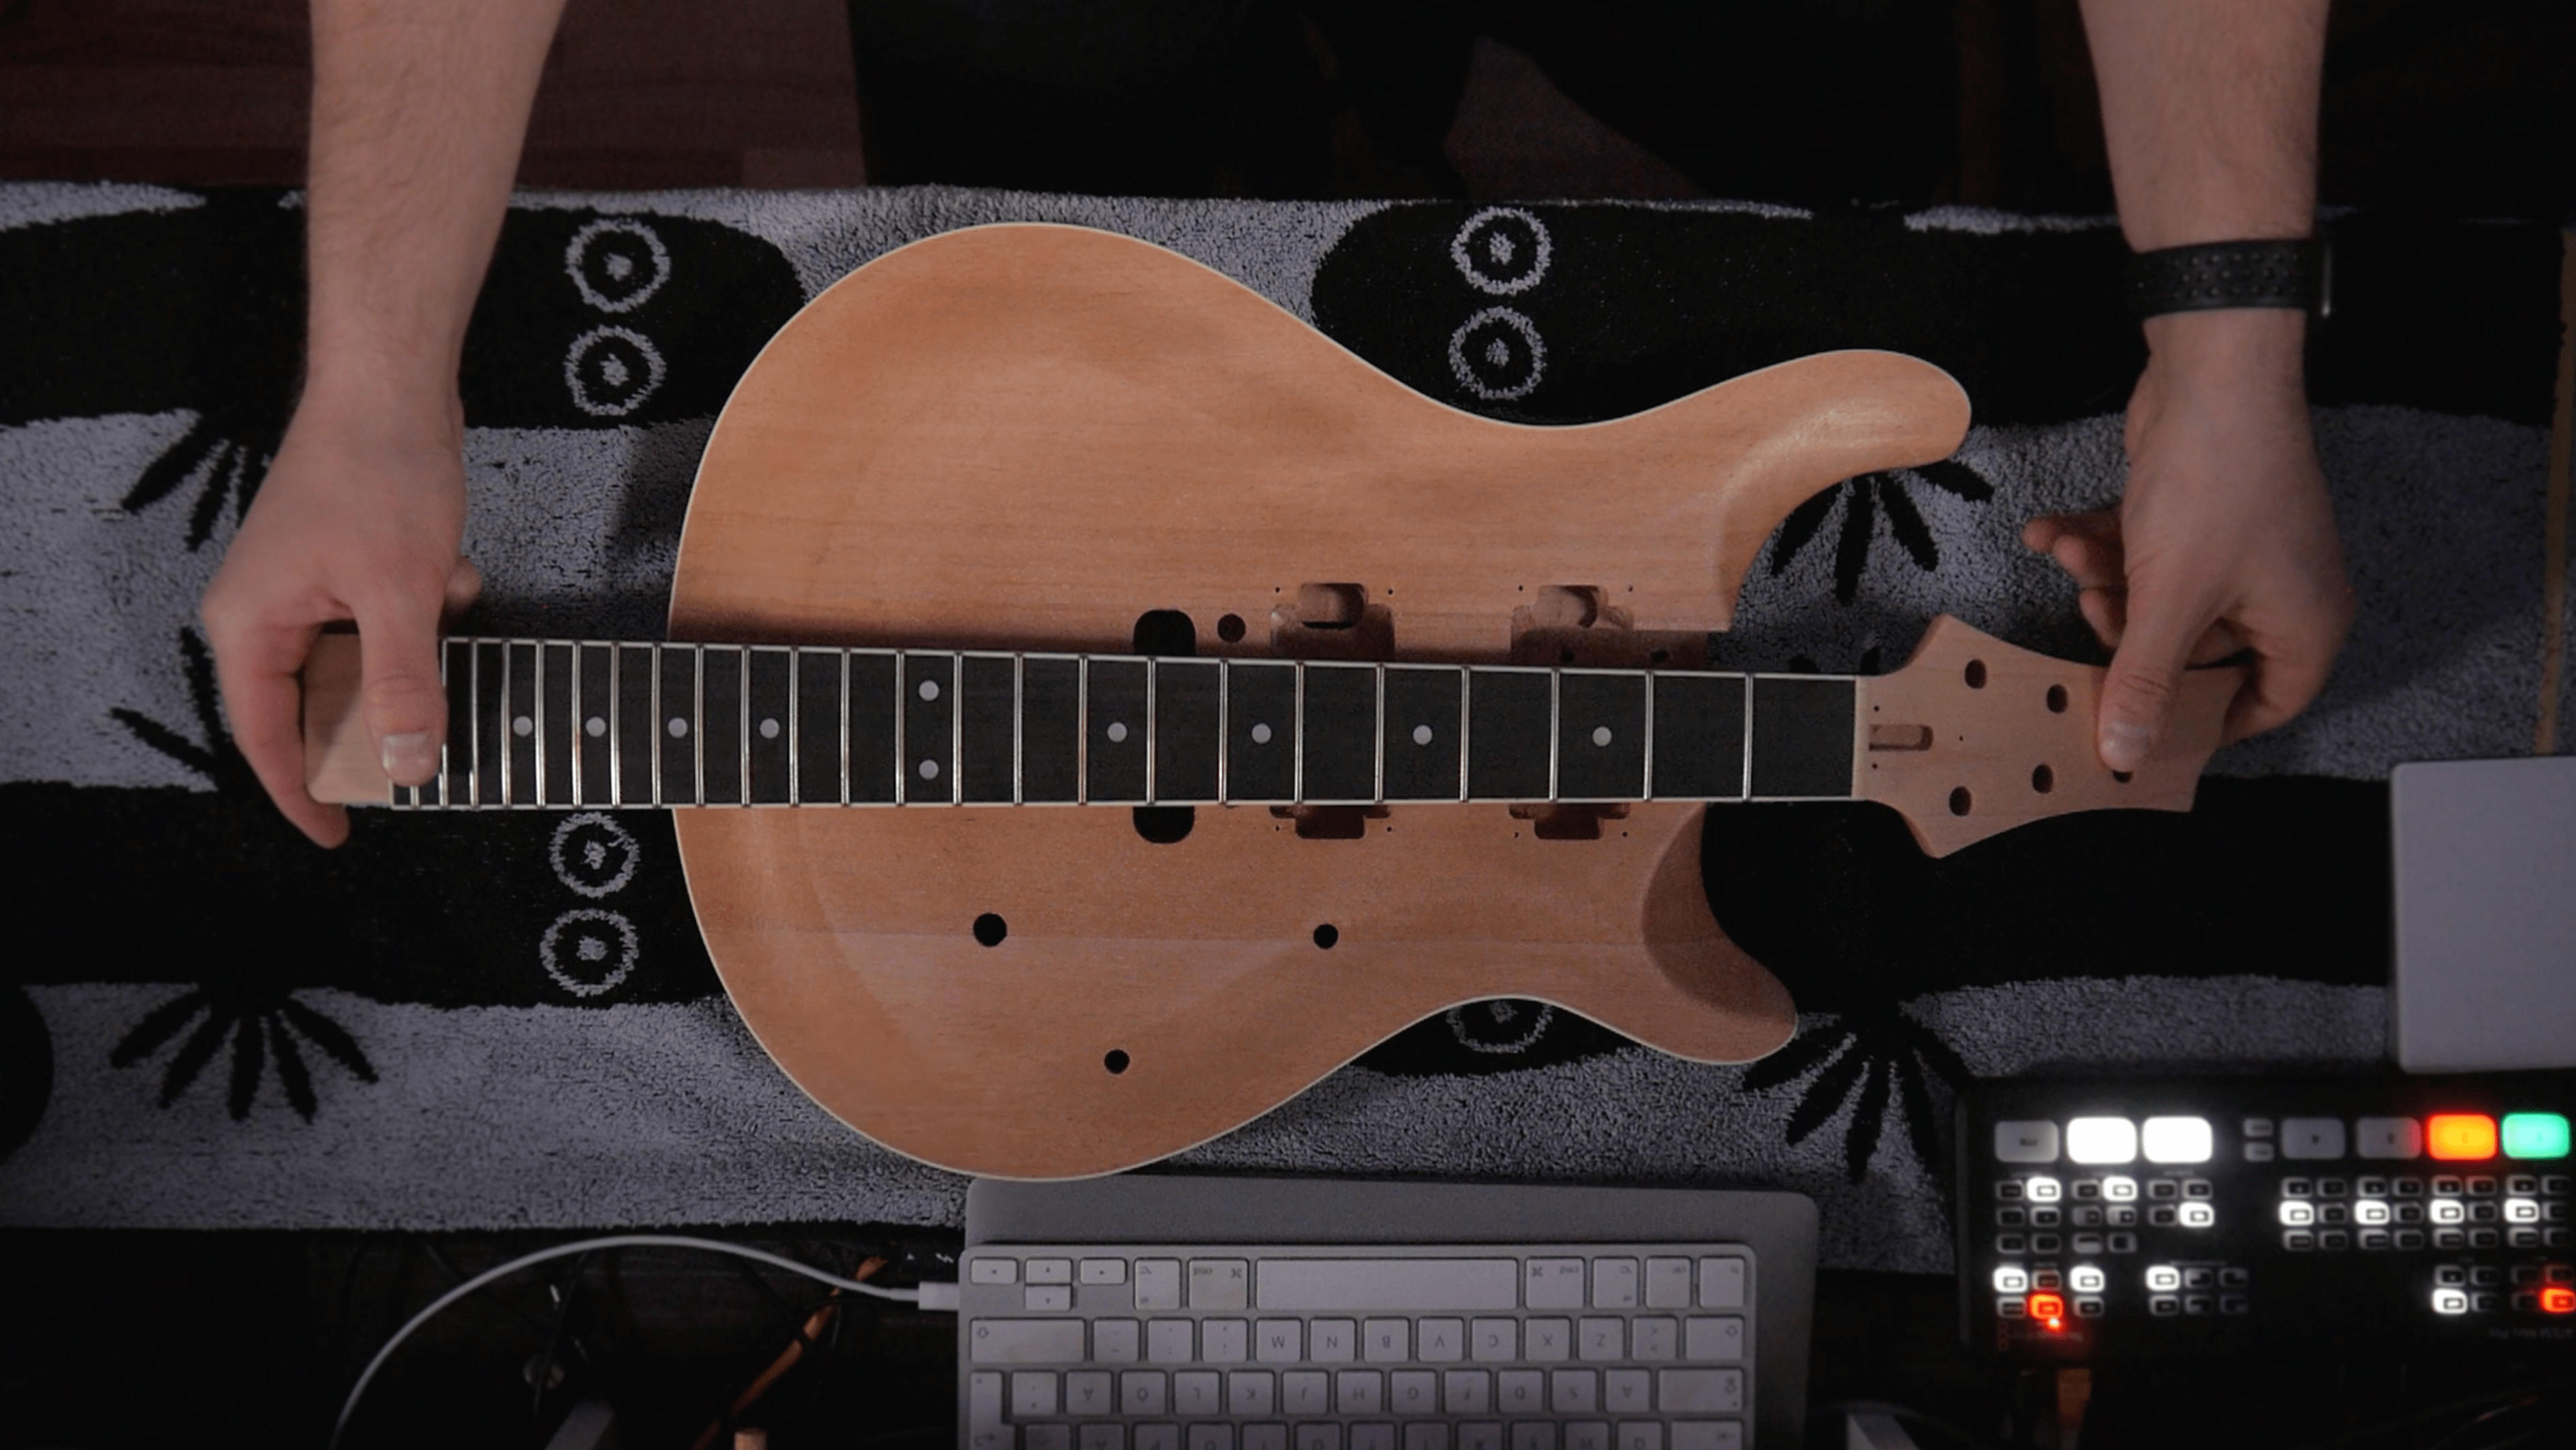
The second I pulled out the guitar body out of the box, I knew I had made the right choice: the guitar body looked and felt great. As mentioned in the specs, it did have pore filler and primer applied to it already, so the body had a nice smooth feel to it. The body was a three-piece, and there was quite a bit of color variation between the pieces, so a natural finish wasn’t really an option.
The maple neck looked great as well with its vintage white binding and its Amaranth fingerboard. The neck profile was quite thin, and the fingerboard radius seemed flat and modern. The fret ends felt a bit sharp, but it’s something to expect at this price point.
You also get a box that contains the manual to assemble the guitar and a bag that contains all the parts, screws, and strings you need to make this a playable instrument. There’s even an instrument cable included.
The pots and pickups come with quick couplers, so you don’t have to solder anything.
The Assembly Begins
I think the manual wants you to start with something simple just to get you going, because we begin by installing tuners on the headstock. It’s a fairly simple but time-consuming task. The pre-drilled holes on the headstock make the tuner installation easy and difficult to do wrong.
Attaching the neck
Warning: do not screw in the neck attachment screws tight until you have made sure the neck plate is positioned in a way, where all four holes of the neck plate align properly to the holes of the neck.

Even though at first glance the neck plate looks like a square, it actually isn’t, and there’s just one way to place it right. The neck joint cut on the back of the guitar makes it visually confusing, which is something I demonstrate in the video above.
After the initial confusion, the neck was pretty easy to attach. I recommend tightening the neck screws in increments, switching between all four screws to make sure the neck aligns properly with the body. As you can see in the video above, I accidentally used the wrong kind of screw that made the base of the neck crack a bit. Luckily, I have some tools and experience building and repairing guitars, so I was able to glue the crack back together.
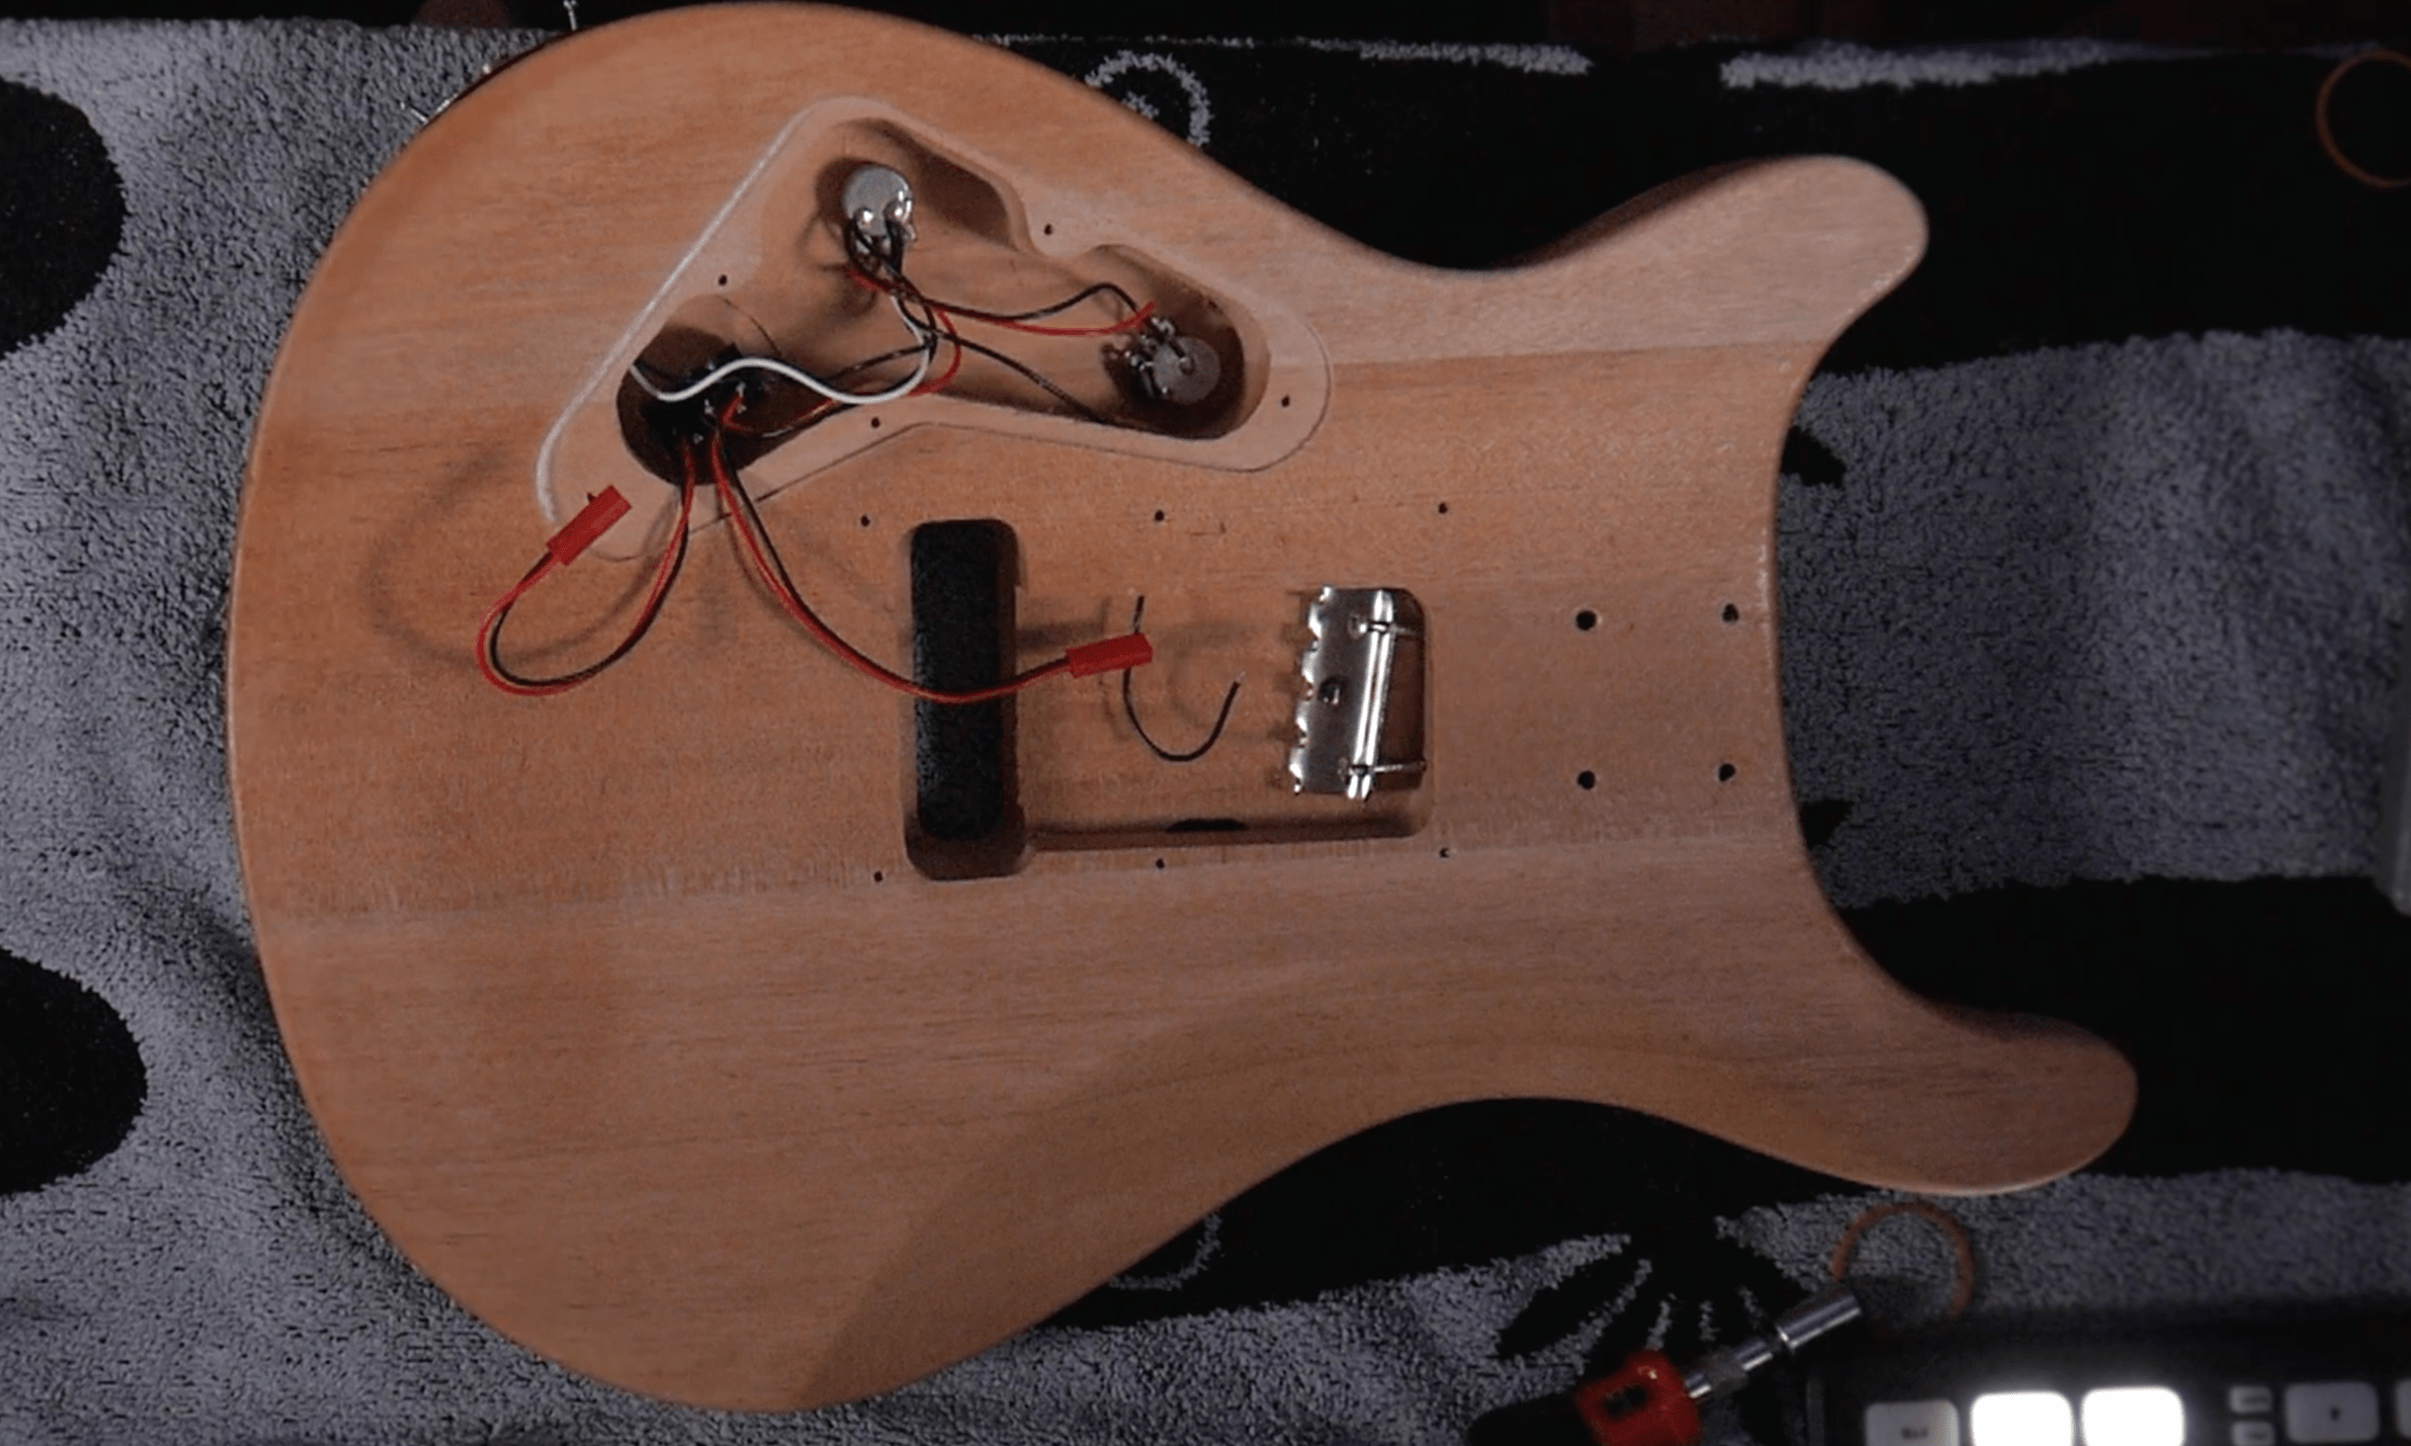
Hardware Installation and Wiring
Following the manual, I proceeded to install the string claw inside the tremolo cavity. Then it was time to start installing pre-wired pots and the output jack. There were no clear markings on which of the pots is volume and which one is tone, but those would be easy to swap in case I put them in the wrong way.
The next thing was to install the bridge studs, that you basically hammer in into the two holes next to the bridge pickup. I strongly recommend using a rubber hammer when doing this because using a metal hammer to hammer in the screws might cause permanent damage to the studs.
If you don’t have a rubber hammer, you can place a cloth on top of the bridge stud and hammer it in carefully.
After the bridge studs were in, I proceeded to install the pickups. The markings on the pickups weren’t super clear, so I had to triple-check which one is the bridge and which one is the neck pickup. With solderless connections, pickup installation was easy, and I attached the ground wire to the string claw with a piece of tape. I will be disassembling the guitar painting anyway, so no reason to solder anything just yet.
Bridge Installation And Balancing
Putting the bridge in place was easy, but you also need to add the springs from the back side without the bridge falling off. You can’t really know in what pattern the springs on the back should be before you put on strings, so I just put them in a straight line. We’ll know more once the strings are on the guitar.
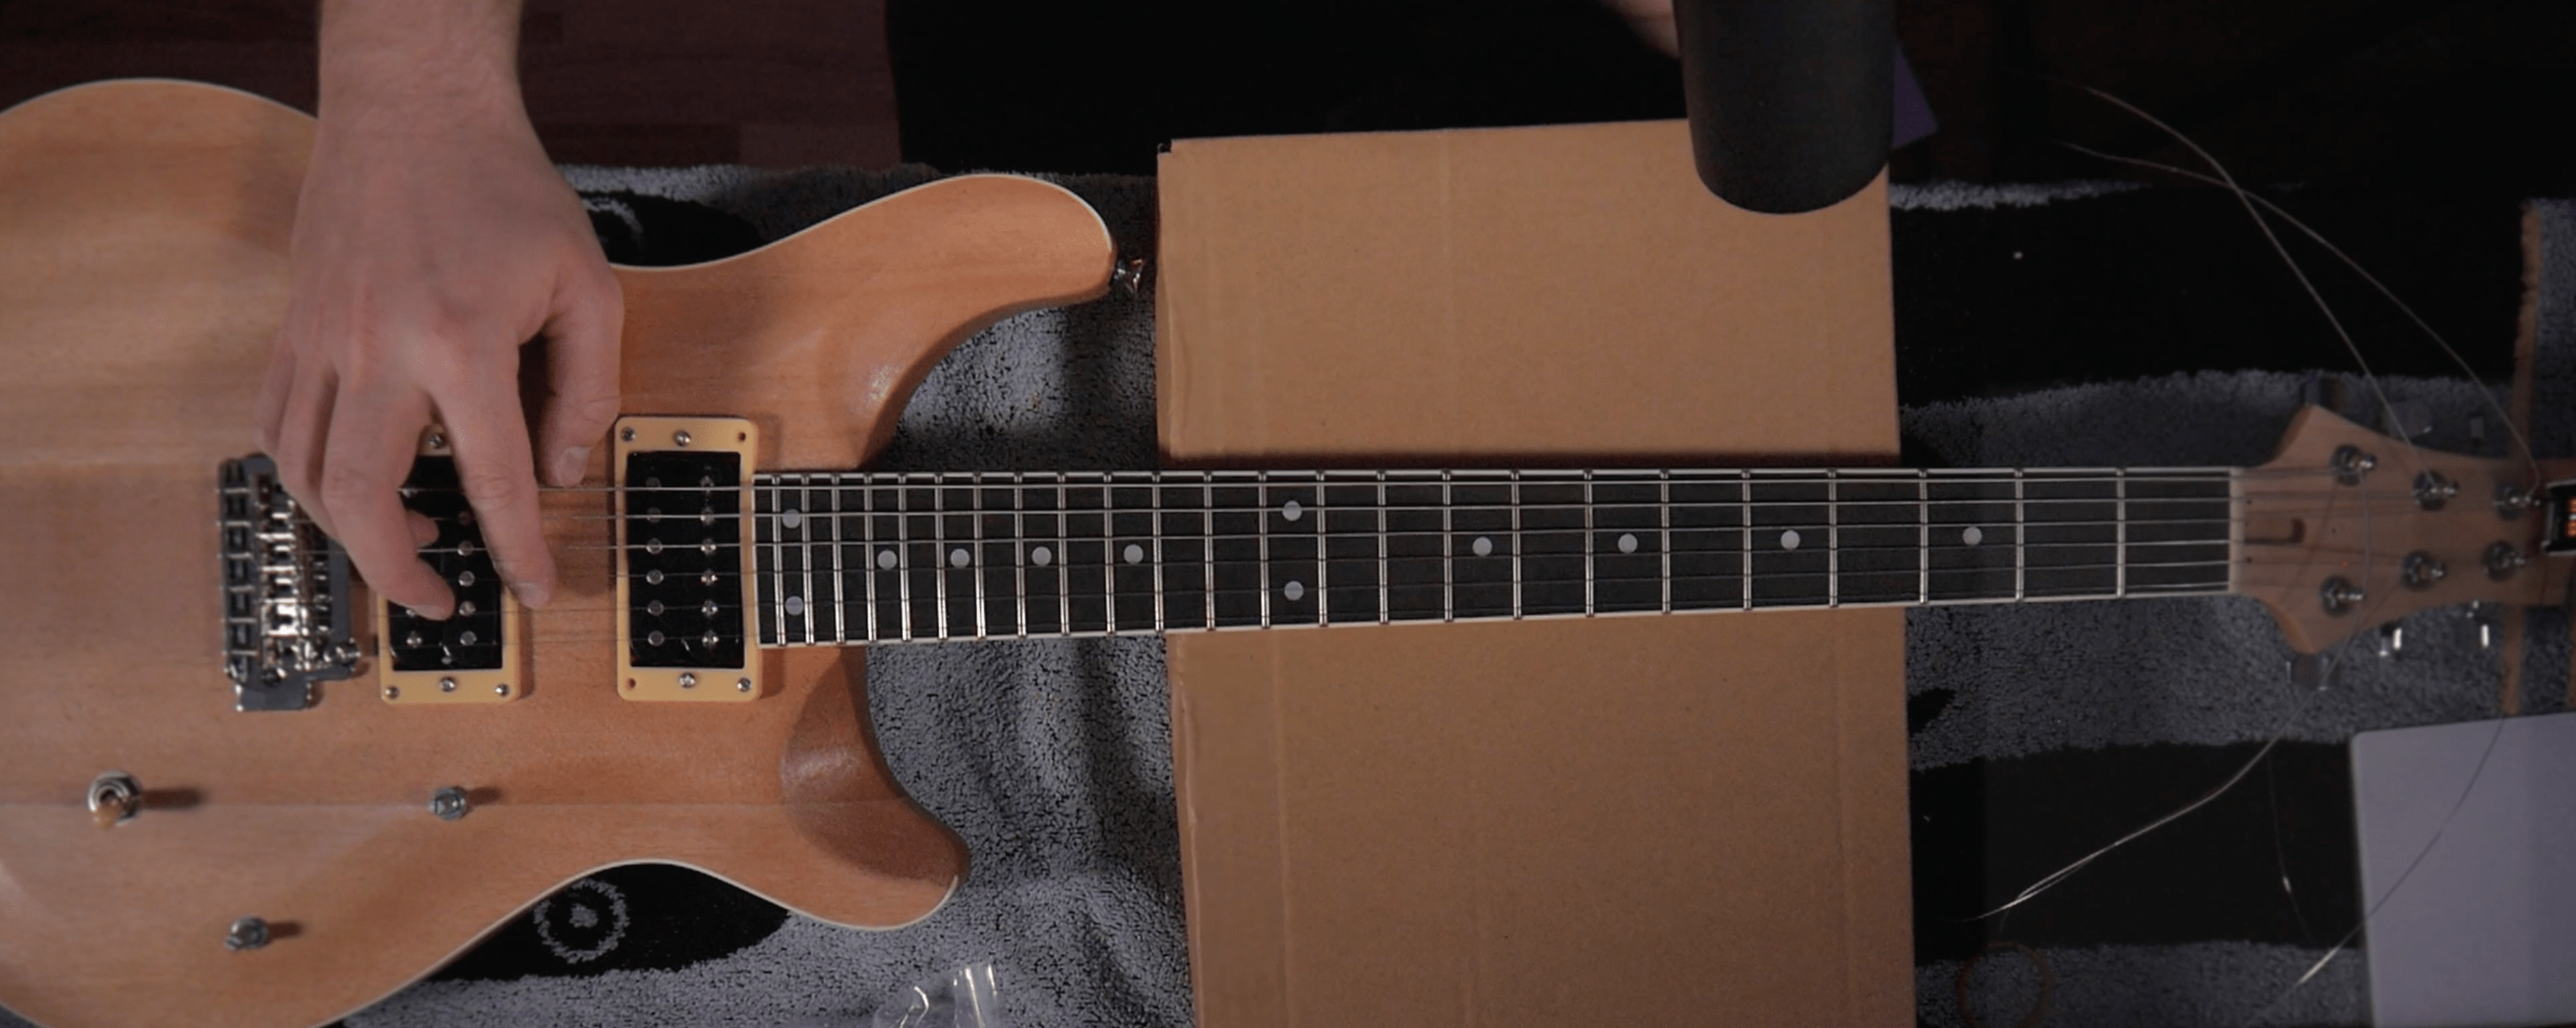
The bridge on the guitar looks nice, and I like that there are individual saddles for each of the strings for proper intonation adjustment.
I added the knobs to the volume and tone controls, and then it was time to put the instrument together.
Attaching the neck
I took out the neck pickup to make the neck attachment easier, and once it was in place, I noticed that the neck pickup’s frame was being bent a bit by the neck itself. This wasn’t my first affordable guitar, though, so something like this was bound to happen, and I would address it later.
Putting on strings and first sound test
Even though this is a very affordable guitar kit, I still find it exciting plugging it in for the first time and hearing how it sounds (or in this case if everything even works!).
I gave the guitar a super quick setup just so it’s playable enough for me to give it a spin. The sounds through the Uraltone Jr. amp were surprisingly good, and the pickups that came with this guitar seem great. I did notice that my pickup switch and the volume and tone knobs were the wrong way around, but those are easy things to fix!
This guitar feels very decent to play, and the sounds I was getting from this sub-100€ were decent. So you can imagine the excitement I had after those few chords!
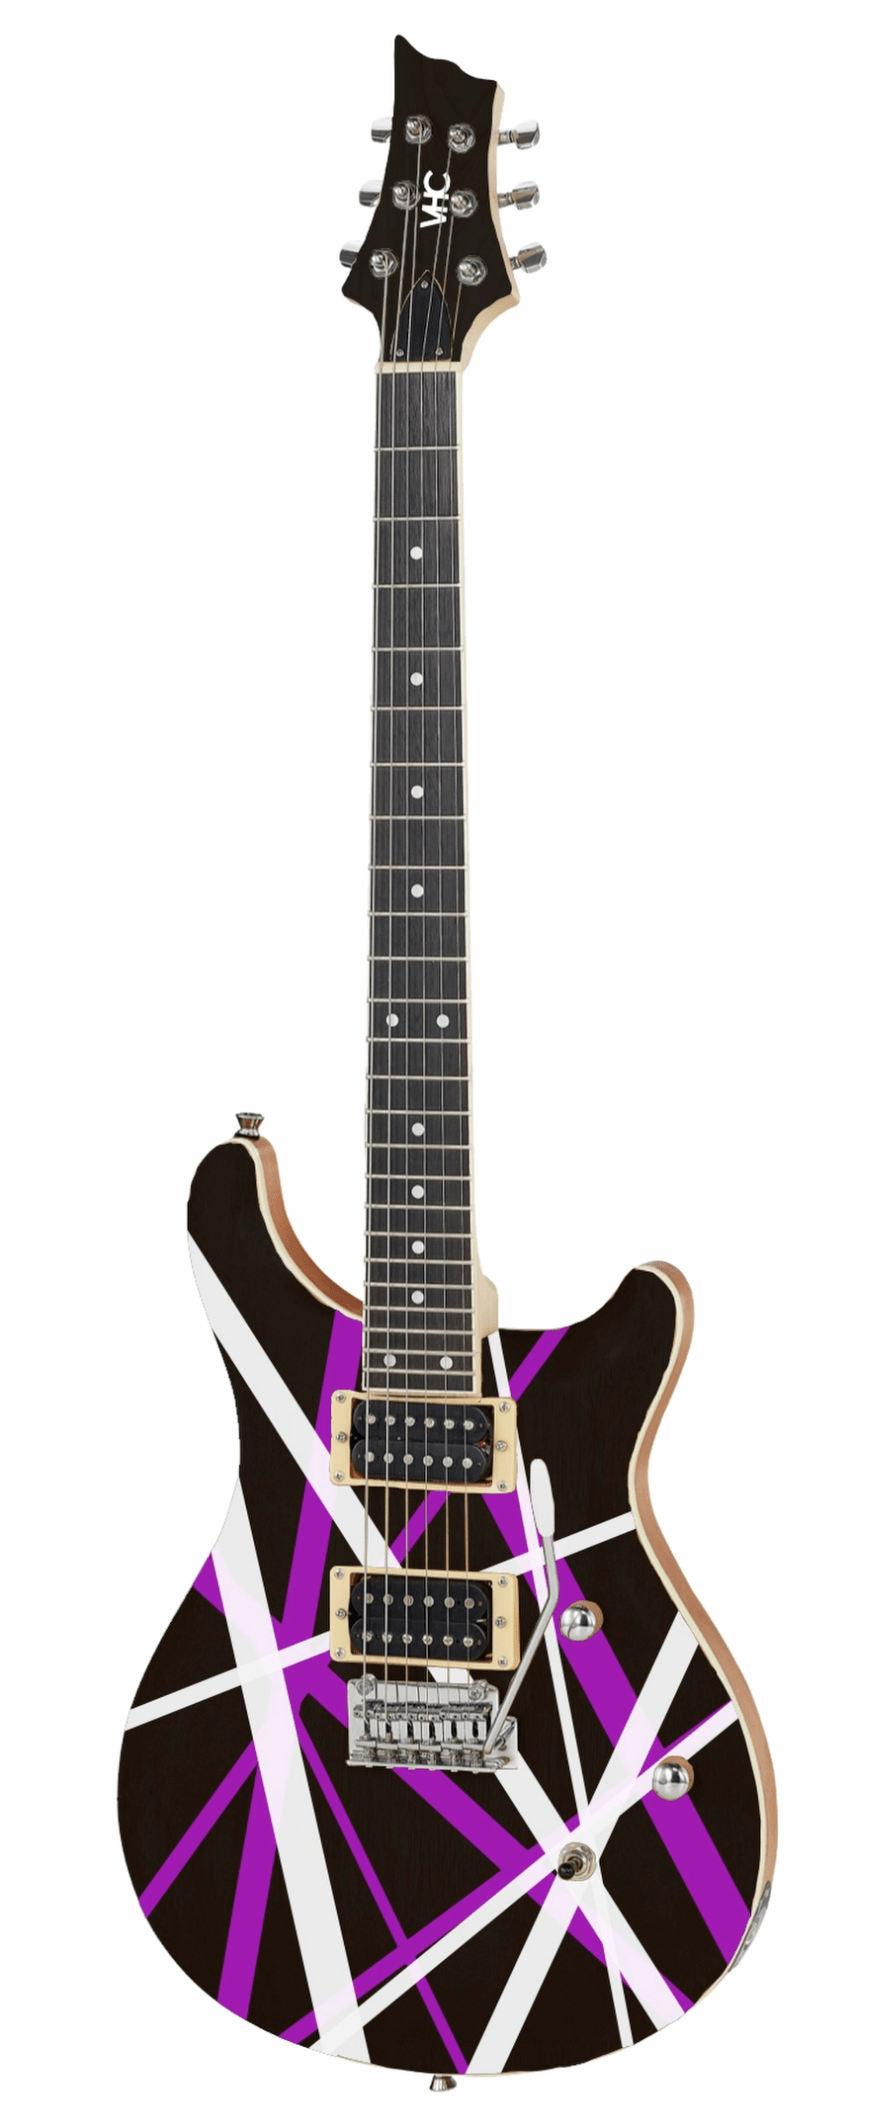
Let’s talk design
The last thing to do was to plan how the finished guitar would look like. I ended up with this silly/awesome looking Van Halen-inspired design.
Because of the DIY Kit challenge deadline, I had to consider how long it would take for the lacquer and paint to dry and decided to only paint the top of and the headstock of the guitar.
In the next part of this series, we’ll put these plans into reality and actually paint this guitar, so see you there!
If you’re interested acquiring your own Harley Benton DIY kit and support what I do, you can find affiliate links here:
►►Harley Benton DIY Kits: https://thmn.to/thocf/cq3g0p7wzj
Leave a Reply