Do you love the idea of modelers but prefer the traditional pedalboard amp + pedals combination for ease of operation? NUX is ready to meet you in the middle with the Trident, aiming to blend together the best of both worlds.
Disclaimer: This pedal was provided to me by NUX and we have worked together on numerous videos over the years. However, even with a long-time collaboration as this the company has no say in the things I mention in the video/post nor do they get to see the content before it is released.
What Is NUX Trident?
NUX Trident is a unique blend of a traditional pedalboard and an amp modeler, especially designed for live use. It comes with a whopping 10 footswitches, comprehensive I/O, a looper, and road-worthy build quality to ensure you get consistent, high-quality sounds from venue to venue.
First Impressions
The first thing that stood out to me was the sturdy chassis: everything feels like it can take a beating. When NUX says they designed the Trident to be road-worthy, I believe them. At first glance, the unit throws a lot of buttons and switches at you, but after some examination, you’ll know your way around quickly.
I had watched a few Trident videos to have a basic understanding of how the small display works, but I’m curious to find out how it actually feels to use. As with other NUX products, the Trident ships with everything you need to use it: power adapter, USB-C cable, 3.5mm TRS to 5 pin MIDI adaptors, and 5x footswitch cap.
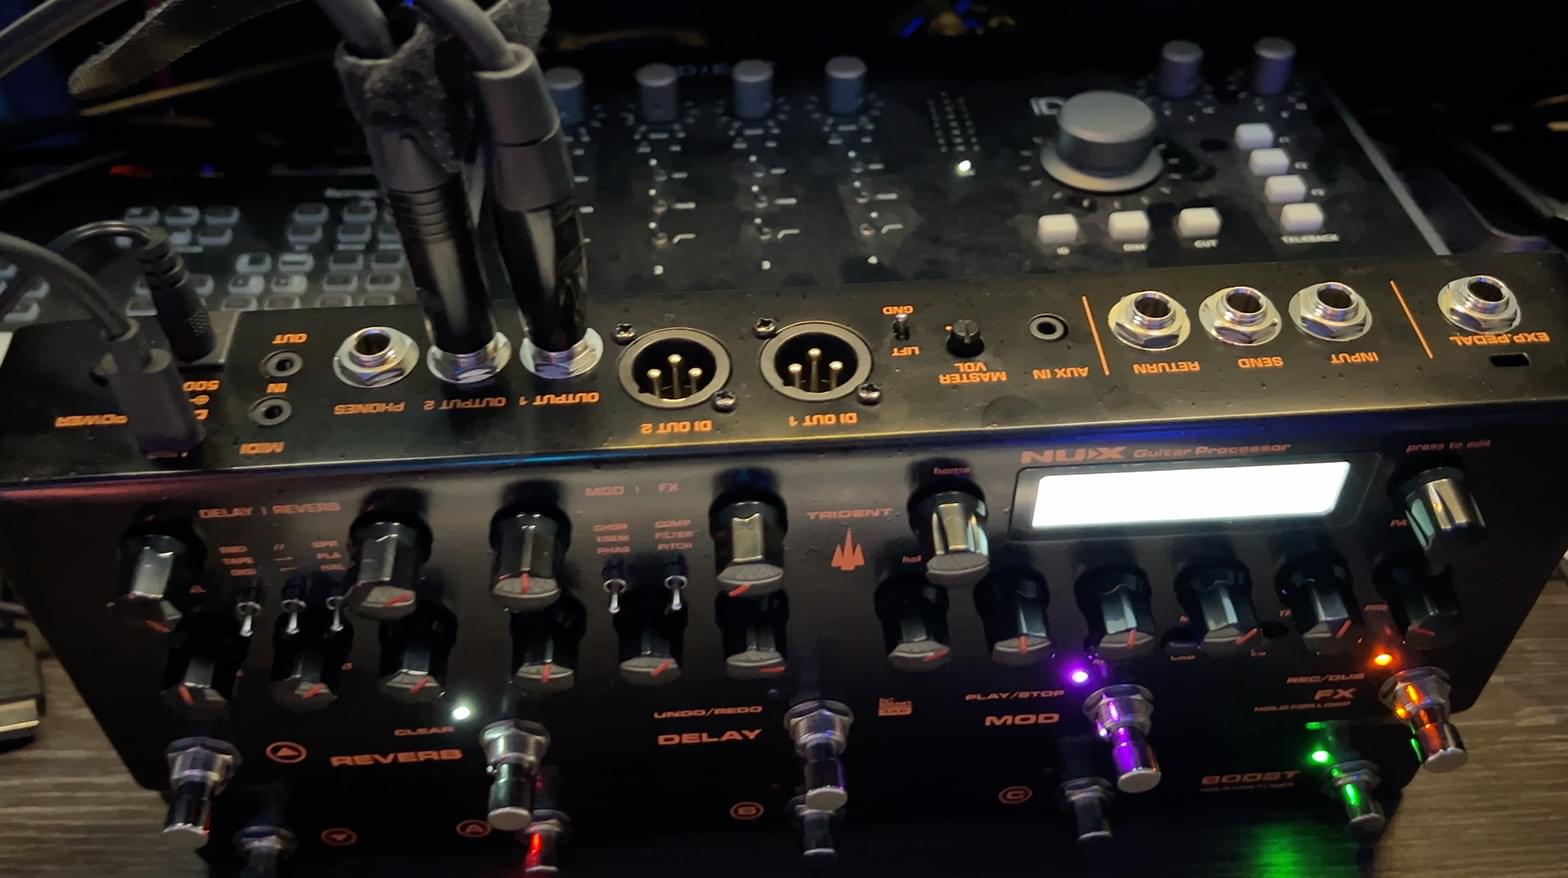
Input and outputs
Looking at the back side of the unit from left to right: Expression pedal in, guitar Input, effects Send and Return, Aux In, Master Volume, Ground/Lift switch, DI Out 1 and 2, Line outputs 1 and 2, Line Output 1 and 2, phones output, MIDI in and out, USB-C, and power-in.
The unit runs on a very reasonable 500mA, which means you should be able to power the Trident with many power supplies available on the market.
Other features
The Trident comes with a 30-second looper that you can operate from the footswitches. If you plug the Trident into your computer, you’ll be able to edit your sounds using the great-looking desktop editor, upload your impulse responses, and install updates.
The Trident also works as an audio interface that you can use for recording and reamping.
What amps, pedals and cabinets are included?
With amps, NUX is sticking with the classics, I’m sure you’ll know what these are. All the amps come with matching cabinets and 4 different microphone options.
COMBOS:
- Twin Rvb
- Brit Blues
- Budda
- Deluxe Rvb
- Class A15
- Class A30
- Tweedy
- Princeton
- Match
- Super RVB
- Bassmate
- L Star
- Vibro King
- Jazz Clean
- Cali Crunch
HEADS:
- Die VH4
- Dual Rect
- Fireman HBE
- Hiwire
- 1987 x 50
- Mr.Z 38
- Brit 800
- Brit 2000
- Plexi 45
- Plexi 100
- SLO 100
- Uber
The Trident comes with a bunch of presets made by influencers and professional musicians. Some of the presets feature custom IRs by Choptones. You can identify those in the desktop editor when you don’t see a microphone in front of the cabinet.
Signal routing
The first time I used the desktop editor, I got a bit confused: on the unit itself, the signal runs from right to left (as on your traditional pedalboard), but in the desktop editor, the signal runs from left to right.
My guess is that NUX wanted to make the signal flow more familiar to pedalboard users, but the editing experience using both the desktop editor and the modeler felt a bit confusing at first.
How the presets work
The presets on Trident work in the groups of three: you use the footswitches on the left to select the preset bank and then which of the three presets from that bank you want to recall.
So for example I use footswitches on the left to go to bank 03, then need to hit A, B or C before the Trident switches to that preset.
Within each of the A, B or C presets you can have any amp, cabinet, and pedal combinations you desire. And not only that, but you can also configure and engage reverb, delay, modulation, FX and boost per preset and turn those on or off.
Basically, Trident offers you a huge collection of classic amps and pedalboards that you can recall with a press of a footswitch.
It’s an interesting and different approach I haven’t seen on other modelers.
Adjusting the sounds within a preset
What makes Trident different from other modelers is that you have physical knobs to control many of the effects inside the unit. There are switches to quickly choose between different delay and reverb types and to change the order of those in the signal chain.
You can also tap the delay switch to set the tempo of your delay.
Next to the delay/reverb block, there’s the modulation/FX block that operates the same way as the delay/reverb block does.
Below the display are standard controls for the amp (Gain, Level, Bass, Middle, Treble, Presence). Underneath those are four quick access buttons for Noise Reduction (NR), Amp, Cab, and EQ that allow quick access to those blocks’ settings.
For me, there was a bit of a learning curve memorizing how everything works, but your mileage may vary. Whoever designed the interface of the unit knew what they were doing. It’s impressive that you can do (almost) everything on this small display as on the desktop editor.
If you want to understand better how to use the Trident, I recommend checking out the video above. There I explain how to adjust different parameters and settings on the Trident itself.
How does the Trident sound?
To test the Trident, I created three presets for a live situation: one for my telecaster, one for my semi-hollow humbucker guitar, and one for an acoustic guitar.
Starting with my telecaster, I added a noise gate as the first thing in the signal chain followed by a compressor. Next, I added a boost as the third pedal before the amp. Paired with the Match amp, the three pedals gave a great base to work on the rest of the rig. The setup already sounded great, and I hadn’t touched the amp yet.
Unlike with some other modelers in the past, I didn’t feel the need to use custom IRs with this setup. NUX made IRs one of the selling points for the Trident, and they delivered. At no point did I feel the need to upload any of my favorite impulse responses.
With the desktop editor, you can see the controls and settings of the amps, pedals, and effects, and that makes creating presets fun.
For the semi-hollow humbucker guitar, I copied the telecaster preset and made some gain and EQ adjustments on the pedals to match the different characteristics of that guitar.
With the acoustic guitar, I decided to keep things relatively simple and didn’t add an acoustic IR, for example. I added a compressor, some subtractive EQ, and a bit of reverb.
I was happy with all three tones I got. And if you happen to own a NUX Trident, you can download those sounds for free here.
How To Reamp With NUX Trident
As mentioned at the beginning, the Trident can work as an audio interface as well. This also allows us to do things like reamping with ease.
(If you don’t know what reamping is or want to learn how to do it the right way, drop me a comment down below or email me.)
- Plug in your Trident into your computer. If you’re using a PC, you need to download drivers from the NUX website. If you’re on MAC, the Trident should show up on your computer as an audio source right away.
- Send the DI track signal from your DAW into Trident. (the output channel depends on your setup).
- To route the signal the right way in the Trident, you need to open the desktop editor, click the cogwheel in the top right corner and select the Reamp routing mode.
- In your DAW, play the DI track and record the incoming signal from the Trident onto a new track. (In my case, I ended up using the line outs on the Trident to record the reamped signal. I was stacking my Audient interface with the Trident, and there was some sort of mismatch between the two, and I couldn’t hear the reamped track through my studio monitors.)
- If you are using just Trident without other audio interfaces, you can monitor your reamping using the headphones out on the Trident.
How To Use The Looper On NUX Trident
I’m not great at looping, but I still enjoy it from time to time. On NUX Trident, you engage the looper by holding the FX button. Once the looper is on, click the FX button again to start recording your loop. To stop recording that loop, hit the Mod footswitch. The looper starts playing what you just recorded.
If you want to add more tracks as part of your loop, click the FX button again and record your overdub. Remember to hit that Mod button again to stop overdubbing. You can also undo your latest take by hitting the Delay button (undo/redo).
While the looper on the Trident might not appease the loop masters, for an average guitarist, it’s a fun extra to have. I had a lot of fun looping even though I’m not good at it.
Is NUX Trident Good?
I love the concept of the NUX Trident. To me, it feels more like a pedalboard than a modeler. I wouldn’t go as far as saying it feels exactly like a pedalboard to use, but there’s a more hands-on approach that will appease many users.
The modeling sounds great, and the unit is built like a tank. And I love that you can do everything that you can do on the desktop editor on the unit itself. The impulse responses the Trident comes with are so good that I didn’t feel any need to use any of the custom ones.
With its different approach to modeling, the Trident might be a bit more of a niche choice, but those who get one will be incredibly happy with their robust gig machine.
If you’re interested acquiring the NUX Trident and support what I do, you can find affiliate links here:
►►Get NUX Trident On Thomann: https://thmn.to/thoprod/437353?offid=1&affid=394
►►Get NUX Trident On Reverb: https://reverb.partnerlinks.io/nux-trident
Leave a Reply